• AnyStream is having some DRM issues currently, Netflix is not available in HD for the time being.
    Situations like this will always happen with AnyStream: streaming providers are continuously improving their countermeasures while we try to catch up, it's an ongoing cat-and-mouse game. Please be patient and don't flood our support or forum with requests, we are working on it 24/7 to get it resolved. Thank you.

Guide Reencoding videos via free command-line tools and GPU

Someone asked me the following question:
Could you explain to me what the Avisynth filter TemporalDegrain2 does?


TemporalDegrain2 - A High-Performance Denoising Filter

Introduction:

TemporalDegrain2 is a highly advanced AviSynth filter that provides exceptional noise reduction and image sharpening. This filter represents a significant breakthrough in video processing and offers a remarkable boost in visual quality. It is particularly effective in scenarios where traditional denoising methods are insufficient, making it a top choice for professionals and enthusiasts.

Performance Note:
TemporalDegrain2 is a video denoising tool that is known for its exceptional performance. However, it's important to note that it can be quite computationally intensive. This means that while it can significantly improve video quality, it requires a robust system to handle its processing demands. Users should be aware of the increased resource usage, especially when working with high-resolution or lengthy video files. This filter suits those with access to powerful computing resources who want the best output without compromise.

Conclusion:
TemporalDegrain2 is an exceptional tool for noise reduction and image enhancement. Its unique ability to remove noise while maintaining natural-looking results makes it a valuable asset for any videographer. However, due to its high computational demands, it is essential to consider the hardware requirements to ensure optimal functionality and results.

Download and Installation:
If you want to use TemporalDegrain2 in your video projects, you can download the filter from here: http://avisynth.nl/index.php/TemporalDegrain2.
Please ensure that you have installed all the required plugins. This is crucial for the filter to function correctly and to achieve the best results possible.

EDIT:
To provide more details about the settings, here are some recommended settings from the filter's page. You can find the link under Download and Installation as mentioned earlier.

Code:
Suggested settings for removing the grain, sorted by increasing source grain
degrainTR=0,postFFT=0 (aka Undot)
degrainTR=0,postFFT=1,postSigma=value between 0 and 1
degrainTR=1,grainLevel=-1,postFFT=0
degrainTR=1,grainLevel=0,postFFT=0
degrainTR=1,grainLevel=0,postFFT=1,postSigma=value between 0 and 1
degrainTR=1,grainLevel=1,postFFT=0
degrainTR=1,grainLevel=1,postFFT=1,postSigma=value between 0 and 2
degrainTR=1,grainLevel=2,postFFT=0
degrainTR=1,grainLevel=2,postFFT=1,postSigma=value between 0 and 2
degrainTR=2,grainLevel=2,postFFT=1,postSigma=value between 0 and 2
degrainTR=2,grainLevel=3,postFFT=1,postSigma=value between 0 and 2

Please note that as you go higher, the level of computational intensity increases.
For example:
degrainTR=0,postFFT=0 (aka Undot) During my test, I achieved a frame rate of approximately 120 frames per second.
degrainTR=2,grainLevel=3,postFFT=1,postSigma=1 During my test, I achieved a frame rate of approximately 10 frames per second.

Test System: Intel Core i5 13600 processor, 64GB of RAM, Intel ARC A770. The test file was a 1080p video.
 
The latest NVENC 7.41 got a new denoise filter.

--vpp-denoise-dct step=1,sigma=4,block_size=8

The --vpp-denoise-dct filter in Rigaya's NVEnc encoder provides denoising capabilities using a Discrete Cosine Transform (DCT)-based algorithm.

Here's a breakdown of the key parameters and their effects:
  1. step=<int>:
    • Controls denoising quality.
    • Smaller values, like 1, result in higher quality but slower processing.
    • Larger values, like 4 or 8, offer faster denoising but may be less effective.
    • The default value is 2, which balances quality and speed.

  2. block_size=<int>:
    • Specifies denoising block size.
    • A larger block size can yield better denoising results but may be slower.
    • The default is 8, providing a good balance.
    • Using 16 is slower but can be more effective in some cases.

  3. sigma=<float> (default=4.0):
    • This parameter controls the strength of the denoising filter.
    • A larger sigma value results in stronger denoising but may cause blurring.
Combining step=1, block_size=16, and adjusting sigma can result in higher quality denoising but may slow the processing due to increased computational complexity.

Remember that the denoising performance can vary with different source materials since noise patterns differ between videos. Adjusting these parameters based on the specific video content is essential for optimal results.

DCT, or Discrete Cosine Transform, is a mathematical technique used in image and video compression. It transforms spatial pixel values into frequency components, making it useful for denoising by attenuating high-frequency noise while preserving image details.

In addition, the --vpp-denoise-dct filter can be seamlessly combined with other denoising filters available in Rigaya's NVEnc, allowing users to apply multiple denoising techniques for enhanced video quality and noise reduction tailored to their specific needs.

Keep in mind that while configuring denoising parameters, it's essential to check and thoroughly test the results to ensure the desired video quality and noise reduction are achieved, as the effectiveness can vary depending on the source material.
 
Explanation of floating-point numbers and their limit in the sigma parameter:
  • Floating-point numbers are a common numerical representation in computing.
  • They can precisely express a wide range of values, including decimals.
  • The sigma parameter allows fine-tuning the denoising strength.
  • Floating-point values with up to two digits beyond the decimal point (e.g., 1.23 or 4.56) are accepted.
  • For most denoising tasks, this precision level is sufficient.

When working with the sigma parameter in denoising filters, finding the right balance between noise reduction and image quality is essential.
Here are some tips that may help you fine-tune the sigma setting effectively:

  1. Stepwise Adjustment:
    • Start by adjusting the sigma parameter in steps of a reasonable value, such as increments of 5.
    • For instance, if you begin with sigma=10.0, try lowering it to 5.0 to see how the denoising effect changes.
    • This stepwise approach provides a rough estimate of the denoising strength.

  2. Fine-Tuning:
    • If the denoising becomes too strong or weak after a step, don't hesitate to go back by smaller steps, like 2 or 1, to reach a satisfactory level.
    • The goal is to find a point where noise reduction is effective without sacrificing image details.

  3. Decimal Precision:
    • Once you're near your desired setting, consider using values with two digits beyond the decimal point (e.g., .25, .50, .75) to fine-tune the sigma parameter.
    • This allows for precise control over the denoising strength.

  4. Testing with --trim:
    • To evaluate the impact of your sigma settings, you can use the --trim function to encode only a specific portion of frames in your video.
    • By encoding a limited segment, you can quickly assess how the denoising filter affects that specific section without encoding the entire video, saving time and resources.
Remember that the optimal sigma value may vary from one video to another, depending on the noise characteristics and your desired output. Experimentation and testing are crucial to finding the perfect balance for your specific content.
 
HI every one

I have a newbie question about encoding avisynth script via NVENCC.
I normally use Staxrip to generate/ input the script and encode via the GPU.
As I understand it NVENCC can read avisynth script on its own. But when I feed the script to staxrip(using GPU decoding and enncode with GPU , the resultant HEVC encode does not seem to have any denoising done.
It may be a stax tip issue. But question-

--does NVECC require decoding by avisynth in order to receive the information in the avisynth script? ie we must use "avisynth" in decoder option rather than "HArdware" decoding?( stax rip give the option to choose). If nvencc can read avisynth scripts I am puzzled why the script will not work via hardware decoding?
Choosing avisynth decoding does make the script work but its slow to produce the encode.
My script:

SMDegrain(video, tr=2,thSAD=300,thSADC=200,thSCD1=400,thSCD2=130,contrasharp=true,prefilter=8, gpuid=0, str=1.2, plane=0, refinemotion=true)
ex_unsharp(0.3,Fc=width()/2)

Thanks for any guidance
Hello,

Could you please share your entire Avisynth script with me?

Additionally, I'd be interested in seeing the full NVENC command you're using.

Avisynth requires the video to be opened within the Avisynth script for it to apply the filters.
 
Just to clarify, the script would look something like this. Please note that this is just a rough draft.

Code:
# Loading video and audio sources
v = LWLibavVideoSource("your_video.mkv")
a = LWLibavAudioSource("your_video.mkv")

# Muxing the audio and video together
audiodub(v, a)

#YOUR FILTER
SMDegrain(tr=2,thSAD=300,thSADC=200,thSCD1=400,thSCD2=130,contrasharp=true,prefilter=8, gpuid=0, str=1.2, plane=0, refinemotion=true)
ex_unsharp(0.3,Fc=width()/2)

# Prefetching frames for multithreading support to better utilize multi-core processors.
Prefetch(6)

If you wish to use NVENC exclusively, then you should download the latest release from the following link: https://github.com/rigaya/NVEnc/releases

NVENC has filter for denoise/degrain
Code:
--vpp-convolution3d
--vpp-nvvfx-denoise
--vpp-nvvfx-artifact-reduction
--vpp-smooth
--vpp-denoise-dct
--vpp-knn
--vpp-pmd
--vpp-gauss

as well as for sharpening
Code:
--vpp-unsharp
--vpp-edgelevel
--vpp-warpsharp

A complete list of filters and their setting can be found here: https://github.com/rigaya/NVEnc/blob/master/NVEncC_Options.en.md

Some "special" filters may only be supported on Turing Gen GPU (RTX20xx) or higher. Some filters may require additional downloads.

More than one filter can be used, just like in this example: --vpp-convolution3d --vpp-denoise-dct sigma=18,step=1
 
Hello,

Could you please share your entire Avisynth script with me?

Additionally, I'd be interested in seeing the full NVENC command you're using.

Avisynth requires the video to be opened within the Avisynth script for it to apply the filters.
Hi tectpro

Thank you for your reply.
so just to check if I understood correctly, avisynth scripts need to be fed to nvecc via avisynth as decoder and not hardware decoder for filters to work?


The scripts and results of my tries:
First test:
seting in staxrip the decoder as Hardware:
Generates this script

--avhw --qvbr 20 --codec h265 --preset P6 --output-depth 10 --profile main10 --mv-precision q-pel

FULL nvencc SCRIPT: "D:\ENCODING FILES\JAn 2024 StaxRip\Apps\Encoders\NVEncC\NVEncC64.exe" --avhw --qvbr 20 --codec h265 --preset P6 --output-depth 10 --profile main10 --mv-precision q-pel -i "E:\SR TARGET\21 bridges denoise test clip\Short clip\21 BRIDGES-TESTclip.mkv" -o "C:\Users\Ryzenpc\Desktop\High TWAEK 21 bri AVS_temp\High TWAEK 21 bri AVS2NVECC_out.h265"

The avs script used as input file to staxrip:

LoadPlugin("D:\ENCODING FILES\DG decNV etc\DGDecodeNV.dll")
DGSource("E:\SR TARGET\21 bridges denoise test clip\Short clip\DGdecodedump\21 BRIDGES-TESTclip.dgi")
SMDegrain(tr=6,thSAD=300,thSADC=200,thSCD1=400,thSCD2=130,contrasharp=true,prefilter=8, gpuid=0, str=1.2, plane=0, refinemotion=true)
ex_unsharp(0.3,Fc=width()/2)
tweak(sat=5)
prefetch(12)

RESULT:

avisynth filters ignored and video IS encoded to HEVC without filters applied

SECOND TEST:

Setting in staxrip decoder as avisynth generates thsi:

"D:\ENCODING FILES\JAn 2024 StaxRip\Apps\Encoders\NVEncC\NVEncC64.exe" --avsdll "D:\ENCODING FILES\JAn 2024 StaxRip\Apps\FrameServer\AviSynth\AviSynth.dll" --qvbr 20 --codec h265 --preset P6 --output-depth 10 --profile main10 --mv-precision q-pel -i "C:\Users\Ryzenpc\Desktop\High TWAEK 21 bri AVS_temp\High TWAEK 21 bri AVS2NVECC.avs" -o "C:\Users\Ryzenpc\Desktop\High TWAEK 21 bri AVS_temp\High TWAEK 21 bri AVS2NVECC_out.h265"

RESULT: avisynth filters have been applied sucessfully.
 
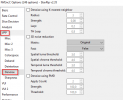
As tectpro was suggesting, why don't you skip the avisynth processing and just use the NVENCC denoising filters?
1708249874675.png

Those are purely GPU based and faster than the avisynth CPU processing.
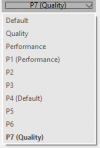
Another question: why use Preset P6? I always use P7 (or "quality")
1708249979228.png
 
Last edited:
so just to check if I understood correctly, avisynth scripts need to be fed to nvecc via avisynth as decoder and not hardware decoder for filters to work?
Yes, that is correct.

FULL nvencc SCRIPT: "D:\ENCODING FILES\JAn 2024 StaxRip\Apps\Encoders\NVEncC\NVEncC64.exe" --avhw --qvbr 20 --codec h265 --preset P6 --output-depth 10 --profile main10 --mv-precision q-pel -i "E:\SR TARGET\21 bridges denoise test clip\Short clip\21 BRIDGES-TESTclip.mkv" -o "C:\Users\Ryzenpc\Desktop\High TWAEK 21 bri AVS_temp\High TWAEK 21 bri AVS2NVECC_out.h265"
Here, NVENC uses the in-build hardware decoder, and there is no denoise/degrain applied.
The usage of the in-build hardware decoder does not load Avisynth scripts.

"D:\ENCODING FILES\JAn 2024 StaxRip\Apps\Encoders\NVEncC\NVEncC64.exe" --avsdll "D:\ENCODING FILES\JAn 2024 StaxRip\Apps\FrameServer\AviSynth\AviSynth.dll" --qvbr 20 --codec h265 --preset P6 --output-depth 10 --profile main10 --mv-precision q-pel -i "C:\Users\Ryzenpc\Desktop\High TWAEK 21 bri AVS_temp\High TWAEK 21 bri AVS2NVECC.avs" -o "C:\Users\Ryzenpc\Desktop\High TWAEK 21 bri AVS_temp\High TWAEK 21 bri AVS2NVECC_out.h265"
Here you can see that AviSynth is loaded via --avsdll "D:\ENCODING FILES\JAn 2024 StaxRip\Apps\FrameServer\AviSynth\AviSynth.dll"


The avs script used as input file to staxrip:

LoadPlugin("D:\ENCODING FILES\DG decNV etc\DGDecodeNV.dll")
DGSource("E:\SR TARGET\21 bridges denoise test clip\Short clip\DGdecodedump\21 BRIDGES-TESTclip.dgi")
SMDegrain(tr=6,thSAD=300,thSADC=200,thSCD1=400,thSCD2=130,contrasharp=true,prefilter=8, gpuid=0, str=1.2, plane=0, refinemotion=true)
ex_unsharp(0.3,Fc=width()/2)
tweak(sat=5)
prefetch(12)

This AviSynth script performs video processing tasks using various filters and plugins. Here's a brief explanation of each line and its function:
  1. LoadPlugin: This line loads the DGDecodeNV plugin from the specified path. DGDecodeNV is a decoder typically used to process MPEG-2 and AVC/H.264 video streams. It's part of the DGDecNV toolset, which is famous for high-quality video decoding, especially in encoding and post-processing workflows.

  2. DGSource: This command uses the DGDecodeNV plugin to open and decode a video file specified by the path and the .dgi project file. The .dgi file contains information about the video stream that aids in efficient decoding. In this case, it's opening a test clip from the movie "21 Bridges."

  3. SMDegrain: This is a denoising filter that removes grain and noise from the video. The parameters control various aspects of the denoising process:
    • tr=6: Temporal radius, indicating how many frames are used for denoising before and after the current frame.
    • thSAD=300: Spatial Adaptive Denoiser threshold for luma (brightness).
    • thSADC=200: Spatial Adaptive Denoiser threshold for chroma (colour).
    • thSCD1=400 and thSCD2=130: Scene change detection thresholds, which help the filter adapt to changes in the video content.
    • contrasharp=true: Enables contrast sharpening to counteract the softening that denoising can cause.
    • prefilter=8: Applies a prefilter before denoising, which can help in preparing the video for more effective noise reduction.
    • gpuid=0: Specifies the GPU device ID to use for processing if the filter supports GPU acceleration.
    • str=1.2: Strength of the denoising.
    • plane=0: Specifies which colour plane(s) to process.
    • refinemotion=true: Enables more accurate motion estimation.
  4. ex_unsharp: This is an unsharp mask filter, used here to sharpen the video. The parameters control the strength and radius of the sharpening:
    • 0.3: The strength of the sharpening effect.
    • Fc=width()/2: Sets the cutoff frequency to half of the video's width, affecting the sharpening radius.
  5. tweak: This filter is used to adjust the video's colour properties, in this case, increasing the saturation (sat=5) to make the colours more vivid.

  6. prefetch(12): This command is used to improve the efficiency of script processing by allowing AviSynth to process multiple frames in parallel. The number 12 specifies how many frames should be prefetched.
This script decodes a video clip, applies denoising, sharpens the image, enhances colour saturation, and optimizes processing efficiency.

That's why you see different results in the output file.


While StaxRip offers a user-friendly interface for video processing, it's worth noting that it often lags in incorporating the latest versions of tools and plugins. This is a key reason I prefer using command line tools and AVSPmod, as they grant me greater control over the process despite not being as straightforward as StaxRip.
 
Hi Tectpro

Thank you for your reply--its much clearer now.
I understand your advise about staxrip but I am not used to script writing yet--am learning and it seem straightforward enough.
can I check: the line --option-file means the setting for tNVECC that we write in a separate text file and keep in the same folder as the video?
 
As tectpro was suggesting, why don't you skip the avisynth processing and just use the NVENCC denoising filters?
View attachment 77587

Those are purely GPU based and faster than the avisynth CPU processing.
Another question: why use Preset P6? I always use P7 (or "quality")
View attachment 77588
Hi cartman

Thank you, I will try P6.
I did get pretty good results with nvecc denoiser and sharpener at default settings. But for this video that avs script seemed a touch better.
I shall continue to try out
 
line --option-file means the setting for tNVECC that we write in a separate text file and keep in the same folder as the video?
You can keep the option file anywhere on your HDD/SSD since you can easily include the complete path to it.
 
I encountered a malformed video and attempted to fix it.

I recently came across a video that had some issues. The original video was supposed to be in a 4:3 ratio, but the creator added black bars to achieve a 16:9 ratio. The problem was that the video resolution was 1800x1080 instead of 1920x1080, and the black bars were additionally unbalanced. One side had more black than the other, making the video look distorted.

Wondering why that could be a potential issue.
Because of this, the video resolution, after removing the black bars, became 1508x1080, which is not a standard resolution.
This means the original video was "stretched" and had a lot of grain/noise.

There are two ways to fix this.
1. Use Avisynth/Vaporsynth and create a script to remove the black bars, resize to 1440x1080 and remove the grain.

2. Using hardware, which makes it a bit more work because of filters since filters are fixed and can't be switched on how they get processed.
Also, using the same filter twice won't work, as one setting will overwrite the other.

The solution to this I encountered to deliver the best result for hardware encoding is the following steps.
a. Remove the black bars, resize to 1440x1080, and output as HEVC lossless. This will take up a lot of space. 45 minutes uses roughly 40GB.
b. After fixing the malformed video, the regular script can be applied, including noise and grain removal.

Reasoning:
  1. Restoring Original Proportions: Resizing the video first before applying denoising algorithms is important. This helps restore the scene's original proportions, which is crucial because the algorithms analyze the pixels and their relationships. If the video is stretched, these relationships are distorted, which increases the chances of misinterpreting noise and details.

  2. Preserving Details: When a video is stretched, denoising filters might lead to losing important details or introducing unwanted artefacts. This is because the filters can mistakenly treat distorted details as noise. To avoid this, it is recommended that the video first be resized to its correct aspect ratio. Doing so makes the details more accurately represented, allowing the denoising filters to work more effectively.
 
I was asked to provide an AviSynthscript for "mishandled" videos in SD, that should be NTSC but have PAL resolution and have been wrongly de-interlaced.

Here is one possible way to do it.

Code:
#Load the movie or the episode
movie = FFmpegSource2("MOVIE.mp4")

# Step 1: Rescale to NTSC 720x480
correctedMovie = Spline36Resize(movie, 720, 480)

# Step 2: Apply Telecide and Decimate
telecidedMovie = Telecide(correctedMovie, guide=2, post=2,show=true))
decimatedMovie = Decimate(telecidedMovie, mode=1)

# Step 3: Apply KNLMeansCL for Denoising
denoisedMovie = KNLMeansCL(decimatedMovie, d=3, a=2, h=1.0, channels="Y", device_type="gpu")

# Step 4: Upscale to 960x720 and apply sharpen
upscaledMovie = LanczosResize(denoisedMovie, 960, 720).Sharpen(0.5)

# Step 5: Output the processed video
Return upscaledMovie

Please note that you can optimise this script as you need, and you should adjust the settings accordingly.

More info about the filters and settings here:
Telecide and Decimate
Code:
 https://www.rationalqm.us/decomb/decombnew.html
Information inside the "download".
KNLMeans
Code:
 http://avisynth.nl/index.php/KNLMeansCL

FYI, to edit the Telecide, you can activate it to show information simply add this at the end of that line show=true.
It should look like this and is supposed to help you tweak that settings.

Code:
telecidedMovie = Telecide(correctedMovie, guide=0, post=4,show=true)
 
Back
Top